BPoS Node Registration Guide
Elastos is transitioning from DPoS (Designated Proof of Stake) to BPoS (Bonded Proof of Stake) as part of its Elastic Consensus mechanism. Longtime Elastos contributor and former Council member Yipeng Su has proposed this change to enhance the security and stability of the Elastos main chain and side chains. BPoS comprises stakers and validators. This guide explains how to register a node and become a validator in BPoS. For information on deploying a node before registration, please refer to this Guide.
Table of Contents
- Node Registration Guidelines
- Getting Started
- Steps to Register and Update a Node for BPoS
- Claim ELA Rewards
Node Registration Guidelines
- The node owner must pledge 2,000 ELA, which is locked for a minimum of 72,000 block heights (approximately 100 days).
- This pledge time can be extended beyond the initial minimum requirement. When the pledge time expires, the node also expires automatically.
- The maximum pledge time for staking on a node cannot exceed the expected expiration time of the node.
- After registration, nodes remain inactive and cannot participate in block consensus. However, nodes can start accepting stakers who want to stake their tokens on them.
- Node activation occurs when the total staking rights of all stakers on it exceed 80,000 ELA. Once activated, the node can participate in block consensus.
- In the BPoS protocol, an arbitration cycle consists of 36 blocks. At the beginning of each cycle, 36 validators are randomly selected from all active nodes.
- ELA staking profits to the node owners and their stakers are automatically distributed via blockchain code: 25% for node owners and 75% for stakers.
Getting Started
Download Essentials Wallet
To register a node, start by downloading the flagship Elastos wallet, Essentials. Download the latest version for Apple or Android.
Get ELA on the Mainchain
You can purchase ELA on various exchanges such as Coinbase, Kucoin, Huobi, and Gate.io. Alternatively, use the Elastos DEX Glide Finance to purchase ELA on the Elastos Smart Contract (ESC) Chain. For other options, check the Coingecko Markets page for Elastos.
To begin the node registration process, transfer the purchased ELA tokens to the Essentials wallet. Once you have the main chain ELA in your wallet, you can proceed with registration.
Note: ELA listed on Coinbase is the ERC-20 version, and you need to follow this guide to convert it to mainchain ELA for BPoS.
Steps to Register and Update a Node for BPoS
1. Register a Node
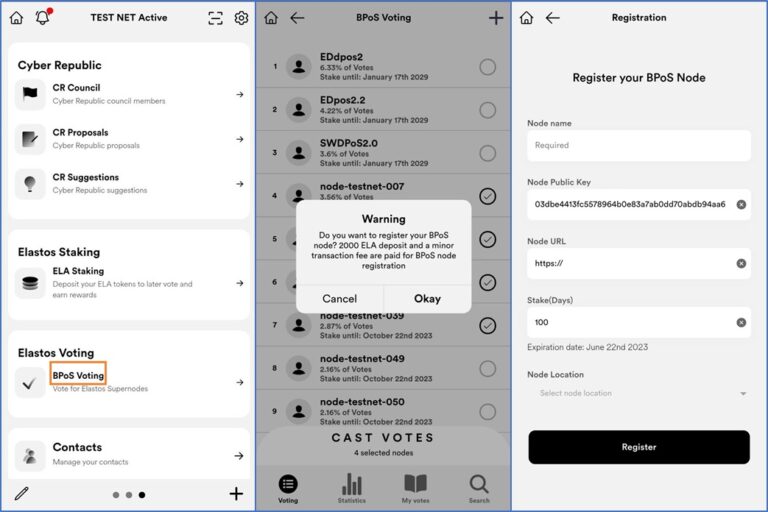
1.1. Log in to the wallet and go to the “BPoS Voting” page by swiping left to the third page of the main interface.
1.2. Click the “+” icon in the upper right corner of the page. A pop-up window will appear with a warning message. Click “Okay” to proceed to the “Registration” page.
1.3. On the “Registration” page, fill in the required information such as node name, node URL, country or region, and number of days pledged. The node public key is displayed by default, but you need to manually modify it to the public key on the server before registering the node. After entering the details, click “Register.”
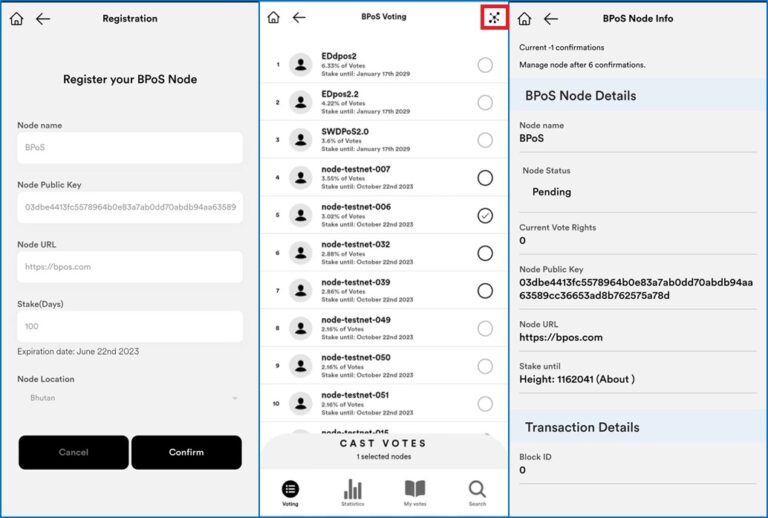
1.4. Review the registration information carefully and click “Confirm” to complete the registration process. Node registration will be finalized after block confirmation.
1.5. Return to the “BPoS Voting” page and click the symbol in the upper right corner to view your node details.
2. Upgrade a Node
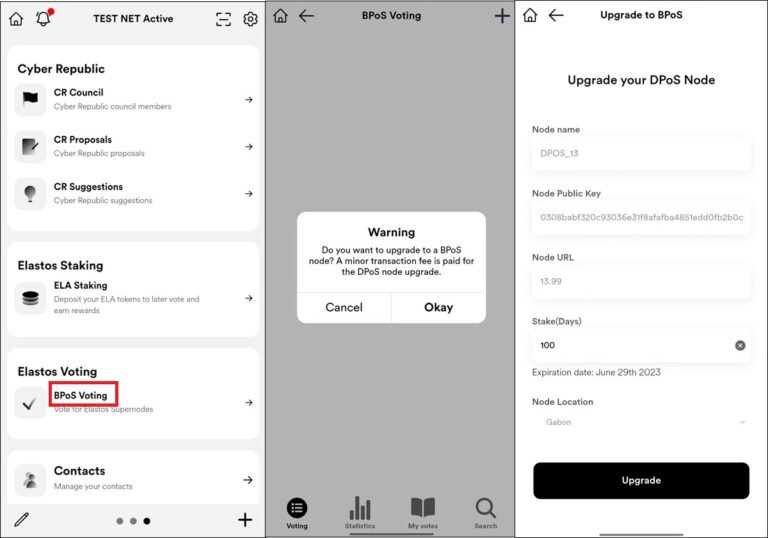
2.1. Log in to the wallet and navigate to the “BPoS Voting” page by swiping left to the third page of the main interface.
2.2. Click the “+” icon in the upper right corner of the page. A pop-up window will appear with a warning message. Click “Okay” to proceed.
2.3. On the “Upgrade to BPoS” page, review the relevant details about the node, such as node name, node URL, country or region, and number of days pledged. Once you confirm the required information, click “Upgrade.”
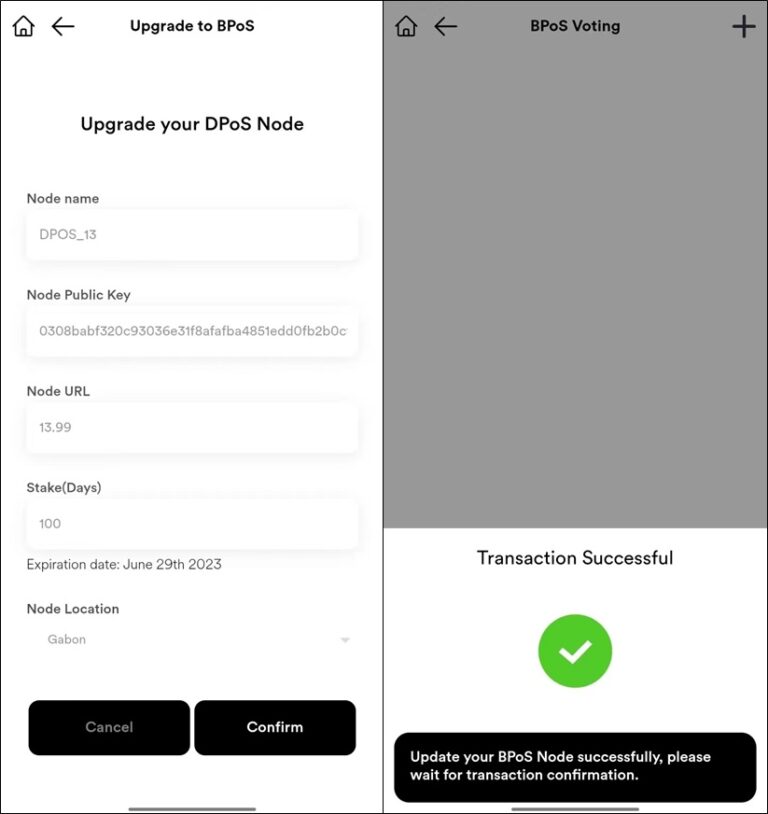
2.4. Review the registration details and click “Confirm” to proceed with the upgrade process.
2.5. The node update process will be finalized after successful block confirmation.
Claim Node Rewards
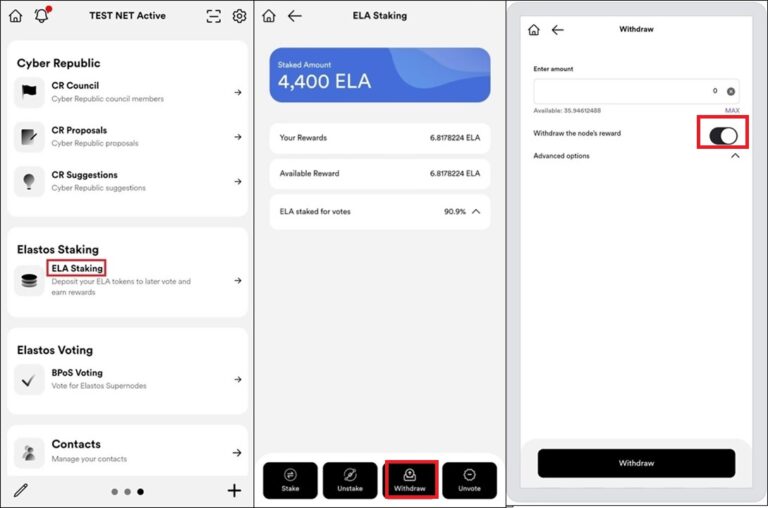
Go to the “ELA Staking” page.
Select the “Withdraw” option at the bottom of the page.
Enter the amount of ELA rewards you want to claim and choose the option to “Withdraw the node’s reward.”
Click the “Withdraw” button at the bottom of the page to initiate the process of claiming your ELA rewards.